

What can get missed when a wireless system is packed one component at a time? A wireless microphone road case needs to account for the complete setup, not just the receivers. Transmitters, antennas, power supplies, cables, and other accessories all affect capacity, layout, and access at the venue.
It’s easy to focus on exterior protection and overlook the interior arrangement. But a case that doesn’t suit the equipment footprint can slow setup and make storage less orderly. A good specification balances organized access with secure transport and reflects how the crew handles the system between venues and productions.
This guide explains how to plan capacity around your complete wireless system, assess construction and interior details, and choose between a general-purpose microphone case and a custom-engineered layout. ProX has engineered performance gear since 1984 and offers microphone cases and custom case engineering for defined equipment dimensions and protection requirements. Use the steps below to match case decisions to your gear and workflow.
Key Takeaways
- Build your equipment inventory around the complete system, including receivers, transmitters, antennas, power supplies, and accessories.
- Measure equipment and account for connectors, controls, and protruding parts before planning the interior layout.
- Choose a wireless microphone road case by comparing its verified capacity and dimensions with your full equipment set.
- Consider how layout affects access during setup and strike, not just how equipment fits in storage.
- Use a consistent packing sequence to support orderly repacking, or explore custom case engineering for defined dimensions and protection requirements.
What a wireless microphone road case needs to carry and protect
A wireless microphone road case is specified around the components a production team plans to store and transport together. The equipment list defines the case, not the word “wireless.” A general overview of a Road case explains its role in protecting equipment during transit, while the internal arrangement depends on the actual gear and workflow.
Start by deciding what travels together. A receiver mounted in a rack or installed at a venue may not belong in the case. A receiver that moves with the microphones does need a planned place, along with the components the crew expects to keep with it. This distinction keeps the case plan focused on the equipment it must hold.
Which parts of a wireless microphone system belong in the case?
Make a physical inventory before estimating capacity. Include handheld transmitters, bodypack transmitters, receivers, antennas, and power supplies when they’re part of the packed system. Add cables and accessories only if the production team intends to store them together. Note equipment that stays mounted or travels separately so it doesn’t distort the case layout.
Consider each item’s shape, not only its name. A transmitter, receiver, antenna, power supply, and cable each occupy space differently. Connectors, controls, antenna fittings, and other protrusions can affect how items sit beside one another and how easily the crew can remove them. Recording these details makes the next stage of case selection more precise.
Why does the full equipment inventory matter?
Component count and form factor determine how much usable space the layout needs and how that space should be divided. A receiver may need a different footprint from a handheld transmitter. Antennas and power supplies may need their own placement rather than being stacked loosely among larger units. Plan around the actual shapes and quantities instead of assuming every system comes in a standard package.
An incomplete inventory can leave essential accessories without a planned storage location. A team might allocate space for its transmitters and receiver but overlook the power supply and cables needed at setup. Those items then compete for room after the layout is already defined. Listing everything at the start helps align capacity with the complete system and the crew’s packing routine.
For a wireless microphone road case, define what equipment belongs inside, what travels elsewhere, and what the team needs to access together. That inventory gives the case specification a practical basis without assuming every production carries the same configuration.
How to choose a wireless microphone road case by fit and layout
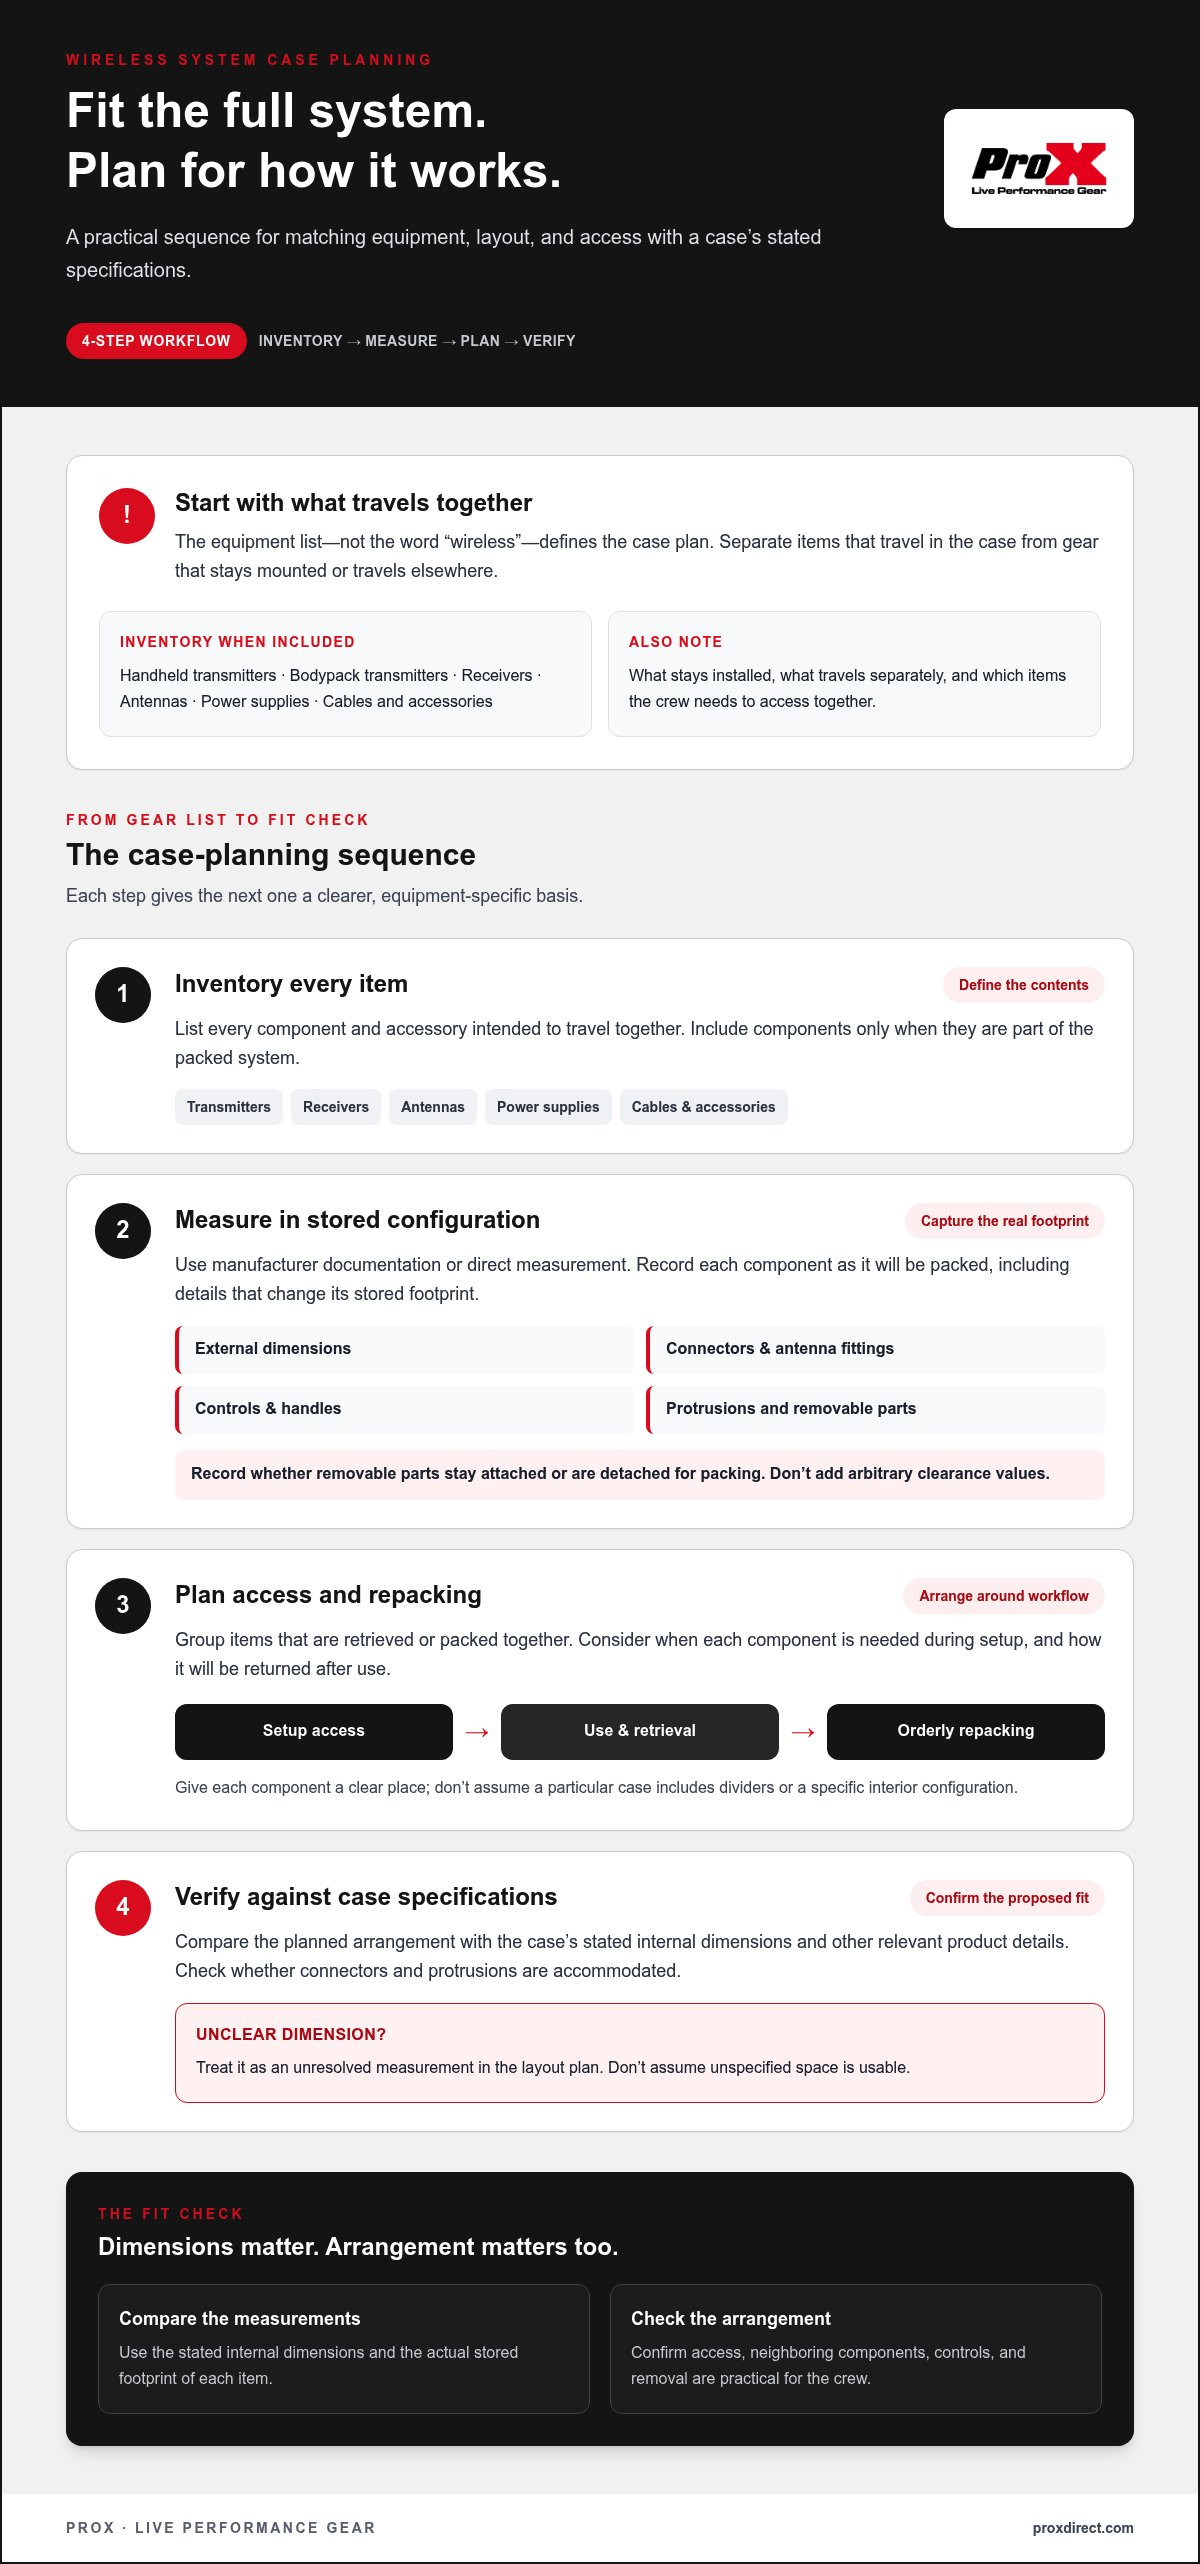
A reliable case specification starts with measured equipment and a planned retrieval sequence, not an estimate based on the system’s general category. Use this order: inventory the equipment, record its dimensions, plan the layout, then compare the arrangement with product specifications. The broader flight case engineering guide provides context on case construction and protection.
How should you measure wireless audio equipment for a case?
Record each component’s external dimensions using manufacturer documentation or direct measurement. Measure it in the configuration in which it will be stored. Note connectors, antenna fittings, controls, handles, and other protrusions that affect the stored footprint. If parts are removable, record whether the crew will detach them for packing or leave them attached.
Don’t add arbitrary clearance values. Use equipment and case specifications to assess fit, including space needed for connectors or access. Dimensions alone don’t show whether a component can sit beside another without obstructing controls or making removal difficult, so check the proposed arrangement as well as the measurements.
What layout makes equipment easier to handle?
Plan the arrangement around the crew’s workflow. Group components that are retrieved or packed together, and decide whether receivers, transmitters, antennas, power supplies, and accessories need separate, identifiable storage areas. Treat this as a planning criterion, not as an assumption that a particular case includes dividers or a specific interior configuration.
For example, if the receiver is used first during setup while transmitters and accessories are distributed later, account for those different access moments in the layout. Also plan how items will be returned after use. Giving each component a clear place can support orderly packing without requiring the crew to rearrange the entire contents.
- Inventory: List every component and accessory intended to travel in the case.
- Measure: Record dimensions, stored configuration, connectors, and protrusions.
- Plan: Group items by access and repacking sequence, allowing for their distinct forms.
- Check specifications: Compare the planned equipment arrangement with the case’s stated internal dimensions and other relevant product details.
Use published product specifications for the final fit decision. If a listed dimension doesn’t make clear whether connectors or other protrusions are accommodated, treat that as an unresolved measurement in your layout plan rather than assuming the space is usable. Compare ProX’s microphone and equipment case options with your measured requirements. Custom case engineering is another option for a defined equipment layout.
Case fit is one part of production planning. The Government of Ontario’s live performance safety guidelines address sound levels, a separate consideration from equipment dimensions and case layout.
Purpose-planned or general-purpose: which case approach fits your system?
A familiar case format can be practical, but familiarity doesn’t establish compatibility. A wireless microphone road case should suit the complete equipment inventory and the crew’s handling sequence. Compare each option with verified dimensions and the intended arrangement rather than relying on a category label or appearance.
When can a general-purpose case meet the requirement?
A general-purpose case can work when its listed internal dimensions and configuration accommodate every component assigned to it. Compare those specifications with the receiver, transmitters, antennas, power supplies, and accessories in your inventory. Then check whether the planned arrangement lets the crew place and retrieve those items as intended.
Check the complete fit, not just whether the largest component can sit inside. Connectors, controls, protruding parts, and accessories affect usable space and access. A case described broadly for audio equipment isn’t proof that it suits your system. Its verified specifications and your planned layout need to align.
When is custom case engineering worth considering?
Project-specific engineering is relevant when equipment dimensions, a defined layout, or protection requirements call for an approach tailored to the system. ProX provides custom case engineering for defined equipment dimensions and protection requirements. Describe the actual components and how the production team intends to store and handle them.
This approach can suit a project when a general-purpose format doesn’t meet the established requirements. Keep the specification grounded in the equipment and protection needs defined for the project, rather than assuming a particular interior feature or outcome.
- Equipment fit: A general-purpose case depends on whether verified internal dimensions suit the full inventory. Custom engineering is planned around defined equipment dimensions.
- Layout flexibility: Assess whether the planned arrangement works within the case’s stated configuration, or whether the project calls for a defined layout.
- Access: Compare how the crew retrieves and repacks components with the available layout, rather than assuming a case provides a particular access feature.
- Specification certainty: Base the decision on product specifications for a standard case or documented project requirements for a custom-engineered case.
The decision is straightforward: use a general-purpose format when its verified fit supports the complete inventory and workflow. Consider custom case engineering when defined dimensions or protection requirements call for a project-specific approach. A familiar format is useful only when it meets those requirements.
A practical workflow for packing and handling wireless microphone equipment
A consistent packing routine gives the crew a clear reference at setup and strike. It can also make missing components easier to spot before departure or after a production. Treat the case layout as part of the workflow: the contents list, storage locations, and repacking steps should match the equipment package in use.
How can crews standardize case contents?
Maintain a written inventory of the equipment assigned to the case. List each receiver, transmitter, antenna, power supply, cable, and accessory that travels with the system. Assign each item a consistent location based on the planned layout, then return components to those places after use instead of changing the arrangement from one production to the next.
Review the inventory and layout whenever the equipment package changes. A replacement component or added accessory can alter what needs to be carried and where it fits. Update the record so the crew’s checklist reflects the current configuration.
What should be checked before and after each production?
Use a repeatable sequence. Before packing, inspect the case and equipment for visible damage, check the inventory, and place each component in its designated location. Follow the equipment manufacturer’s handling guidance for microphones and wireless electronics. After the production, repeat the inventory check while repacking and note missing items or visible changes for follow-up.
- Before departure: Compare the contents with the written inventory and check that components are in their assigned locations.
- At setup: Retrieve equipment in the order the crew needs it, returning items to their designated places when practical.
- At strike: Account for each component and accessory before closing the case.
- After use: Inspect the case and equipment for visible damage, repack consistently, and update the inventory if the package has changed.
This routine supports organization; it doesn’t establish a case’s impact, moisture, or other protection rating. Those claims depend on product-specific information. Select and use a wireless microphone road case according to its verified specifications, and handle the equipment as directed by its manufacturer.
For case options suited to professional audio workflows, explore ProX microphone cases and compare their published specifications with the equipment and handling requirements for your production.
Explore ProX microphone cases or plan a custom case project
With the equipment inventory and workflow defined, compare them with ProX microphone case options. Review published product specifications against the components assigned to the case, their dimensions, and the way the crew needs to access and repack them. Select a wireless microphone road case according to those requirements, not the general equipment category alone.
ProX has engineered performance gear since 1984 and serves customers worldwide through a dealer network. For a project with a defined layout or particular protection requirements, ProX offers custom case engineering tailored to equipment dimensions and project needs.
What information helps define a case project?
Prepare a clear project brief before comparing options or defining a custom case. Include:
- An equipment list with component quantities and external dimensions.
- The intended storage arrangement, including which items need to be accessed together.
- The production handling workflow, from setup through repacking and storage.
- The protection requirements, described in relation to the equipment and its use without assuming a specific rating or construction.
This information gives the case specification a practical basis. It also helps distinguish fixed requirements, such as a receiver’s dimensions, from workflow preferences, such as keeping its associated accessories in the same case.
How can you move from requirements to a case option?
Compare your documented requirements with the specifications published for relevant case options. Check the stated dimensions and configuration against the complete inventory and intended layout. A category name alone doesn’t establish fit, so use each case specification only for the details it actually provides.
ProX’s dealer network provides product access and ordering worldwide. If defined equipment dimensions or protection requirements call for a project-specific design, ProX custom case engineering provides an approach tailored to those criteria. Keep the project requirements explicit so the intended equipment set and use remain central to the case plan.
Use your inventory and workflow notes to guide the next step. Browse ProX cases to review relevant options and their published specifications.
Specify the Case Around Your Production Workflow
A dependable wireless microphone road case starts with a complete equipment inventory. Record component dimensions, account for connectors and protrusions, then compare the planned layout with published case specifications. Fit is only part of the decision: consistent placement and a clear repacking routine can also help crews keep equipment organized through setup and strike.
Choose a standard microphone case when its verified dimensions and configuration suit your equipment and workflow. If defined dimensions or protection requirements call for a tailored approach, ProX custom case engineering provides another path. ProX has engineered performance gear since 1984, and its worldwide dealer network provides access to its case offerings.
Use your inventory and handling criteria to guide the next step. Browse ProX microphone case options and review the published specifications against your system.
Frequently Asked Questions
What should a wireless microphone road case hold?
A wireless microphone road case should hold the components your production team intends to store and transport together. That may include handheld or bodypack transmitters, receivers, antennas, power supplies, cables, and selected accessories. Start with an inventory rather than assuming every system has the same contents. Equipment mounted elsewhere or carried separately doesn’t need to be included, but anything assigned to the case needs a place in its planned layout.
How do I measure a wireless microphone system for a case?
Record the external dimensions of each component using its manufacturer documentation or direct measurement. Measure equipment in the configuration in which it will be stored, and note connectors, antenna fittings, controls, handles, or other protrusions that affect its footprint. Include removable parts if they’ll travel attached. Then compare the complete inventory and intended arrangement with the case’s published internal dimensions and configuration.
Can wireless microphones and receivers go in the same case?
Yes, microphones or transmitters and receivers can share a case if the verified dimensions and layout accommodate them together. Include antennas, power supplies, and accessories if the crew intends to pack them with the system. Consider how components will be accessed and repacked, and follow equipment manufacturer handling guidance. Don’t assume that a broad case category or exterior size confirms the complete system will fit as intended.
Do I need a custom road case for wireless microphone equipment?
Not necessarily. A general-purpose case may meet the requirement if its published specifications suit the full equipment inventory and intended layout. Consider a custom case project when defined equipment dimensions, a specific arrangement, or protection requirements call for project-specific engineering. ProX offers custom case engineering for equipment dimensions and protection requirements. Base the decision on documented needs, not on a category name or an assumed case feature.
How should a wireless microphone road case be organized?
Organize the case around the crew’s setup and repacking sequence. Assign consistent locations to receivers, transmitters, antennas, power supplies, and accessories, then use a written inventory to track the assigned contents. Return components to their designated places after use and review the arrangement when the equipment package changes. This repeatable process helps crew members identify what belongs in the case without assuming a particular interior design.
What information should I provide for a custom microphone case?
Prepare an equipment list with component quantities and external dimensions, including connectors and protrusions that affect stored space. Note whether removable parts stay attached, which components travel together, and how the crew accesses and repacks them during production. Describe the required storage arrangement and protection requirements in practical terms. Clear project criteria give ProX custom case engineering a defined basis without assuming a particular rating, material, or interior feature.
How can I check whether a microphone case fits my equipment?
Compare the case’s published internal dimensions and configuration with the complete equipment inventory and its measured stored footprint. Account for connectors, protruding parts, and accessories, then assess whether the planned arrangement supports access and repacking. A category label alone doesn’t establish compatibility. Use specifications for the details they state, and follow the equipment manufacturer’s handling guidance when determining how components should be stored.
Disclaimer
Any trademarks, trade names or brand names appearing herein that do not belong to ProX are the property of their respective owners and/or companies, and such appearance doesn't and shall not constitute or imply endorsement, sponsorship or recommendation by ProX.


