

A reliable mobile DJ booth starts with a repeatable process, not a larger table or more equipment. Limited space, tangled cables, and inconsistent equipment placement can turn setup into a series of avoidable decisions. This mobile DJ booth setup guide helps you plan where each component belongs, route connections methodically, and keep the performance area accessible from load-in through breakdown.
A consistent workflow matters because venues have different dimensions and constraints, while your essential setup still needs to function predictably. This guide covers booth layout, equipment placement, cable organization, connection order, and pre-event checks. It also explains how to choose protective cases based on equipment dimensions and handling needs. The goal is a clear sequence you can repeat across venues, with gear organized for operation and packed away appropriately.
Key Takeaways
- Use this mobile DJ booth setup guide to establish a repeatable workflow that adapts to different venue layouts.
- Arrange essential controls for clear visibility and comfortable access, then add optional equipment according to event needs.
- Compare compact, expanded, and separated configurations by footprint, reach, cable routing, and transport handling.
- Follow a consistent sequence from venue assessment and equipment placement through connections and system testing.
- Assign storage locations and choose protective cases that suit the dimensions and handling needs of your equipment.
Mobile DJ Booth Setup: Essentials and Functions
A mobile DJ booth is an organized workspace for playback and control equipment, required connections, and the operator. Start with the signal path and the space needed to use it. Then separate essential equipment from additions that depend on the event.
The booth is a working area, not just a display. You need to reach controls, monitor playback, and manage connections without blocking access or creating unnecessary cable crossings. A Disc jockey works with recorded audio for an audience, but the tools and configuration vary by performance method and event. Plan around the set’s actual needs instead of adding equipment by default.
Which equipment has a place in the booth?
Group components by function. A typical signal path may start at a playback source, pass through control or mixing equipment, and continue to the audio output. List the cables, power connections, and accessories needed to complete that path. A short, specific equipment list makes connections easier to identify and keeps unused gear from taking up workspace.
- Playback: The source used to access and play the music.
- Control: The interface or mixer used to manage playback and adjust the audio signal.
- Connections: The audio and power cables needed for the planned equipment path, plus required adapters.
Keep the booth boundary clear. Speakers, lighting fixtures, and other venue production equipment may connect to or coordinate with the DJ system, but they serve separate functions and do not automatically belong on the control surface. Add monitoring, microphone, or lighting control equipment when the event calls for it. This leaves working room for the controls you use throughout the performance.
How does the venue shape the booth plan?
Before choosing a layout, assess the available floor area, your route to and from the booth, audience sightlines, and nearby power access. Consider the event format: a set with a microphone or lighting control needs different workspace from a playback-only performance. Include transport in the plan too, since every additional component must be carried, placed, connected, and stored after the event.
Venue constraints shape the booth layout by setting the available footprint, access routes, sightlines, and connection points.
In a compact room, a smaller equipment package can preserve circulation and keep controls within reach. A larger event area may allow separate zones for controls and accessories, as long as cables can reach without crossing busy paths. More floor space does not automatically mean you need more gear. Match the layout to the performance, your access needs, and the route from transport to operating position.
How should you arrange DJ equipment for access, visibility, and clean cable routes?
Keep frequently used controls within comfortable reach, displays in clear view, and service connections accessible. Begin with the smallest workable footprint, then add space only for equipment the event requires. This gives you a predictable working position without assuming that every venue or performance needs the same arrangement.
A compact, single-surface layout puts playback and control equipment together. It reduces the distance between components and can make access straightforward in a small booth, but accessories and cables may compete for the same surface. A separated layout gives controls and accessories distinct positions. This can reduce crowding around the main controls, but it needs more floor or table space and careful planning for cable reach and access.
How can you adapt the booth footprint to different venues?
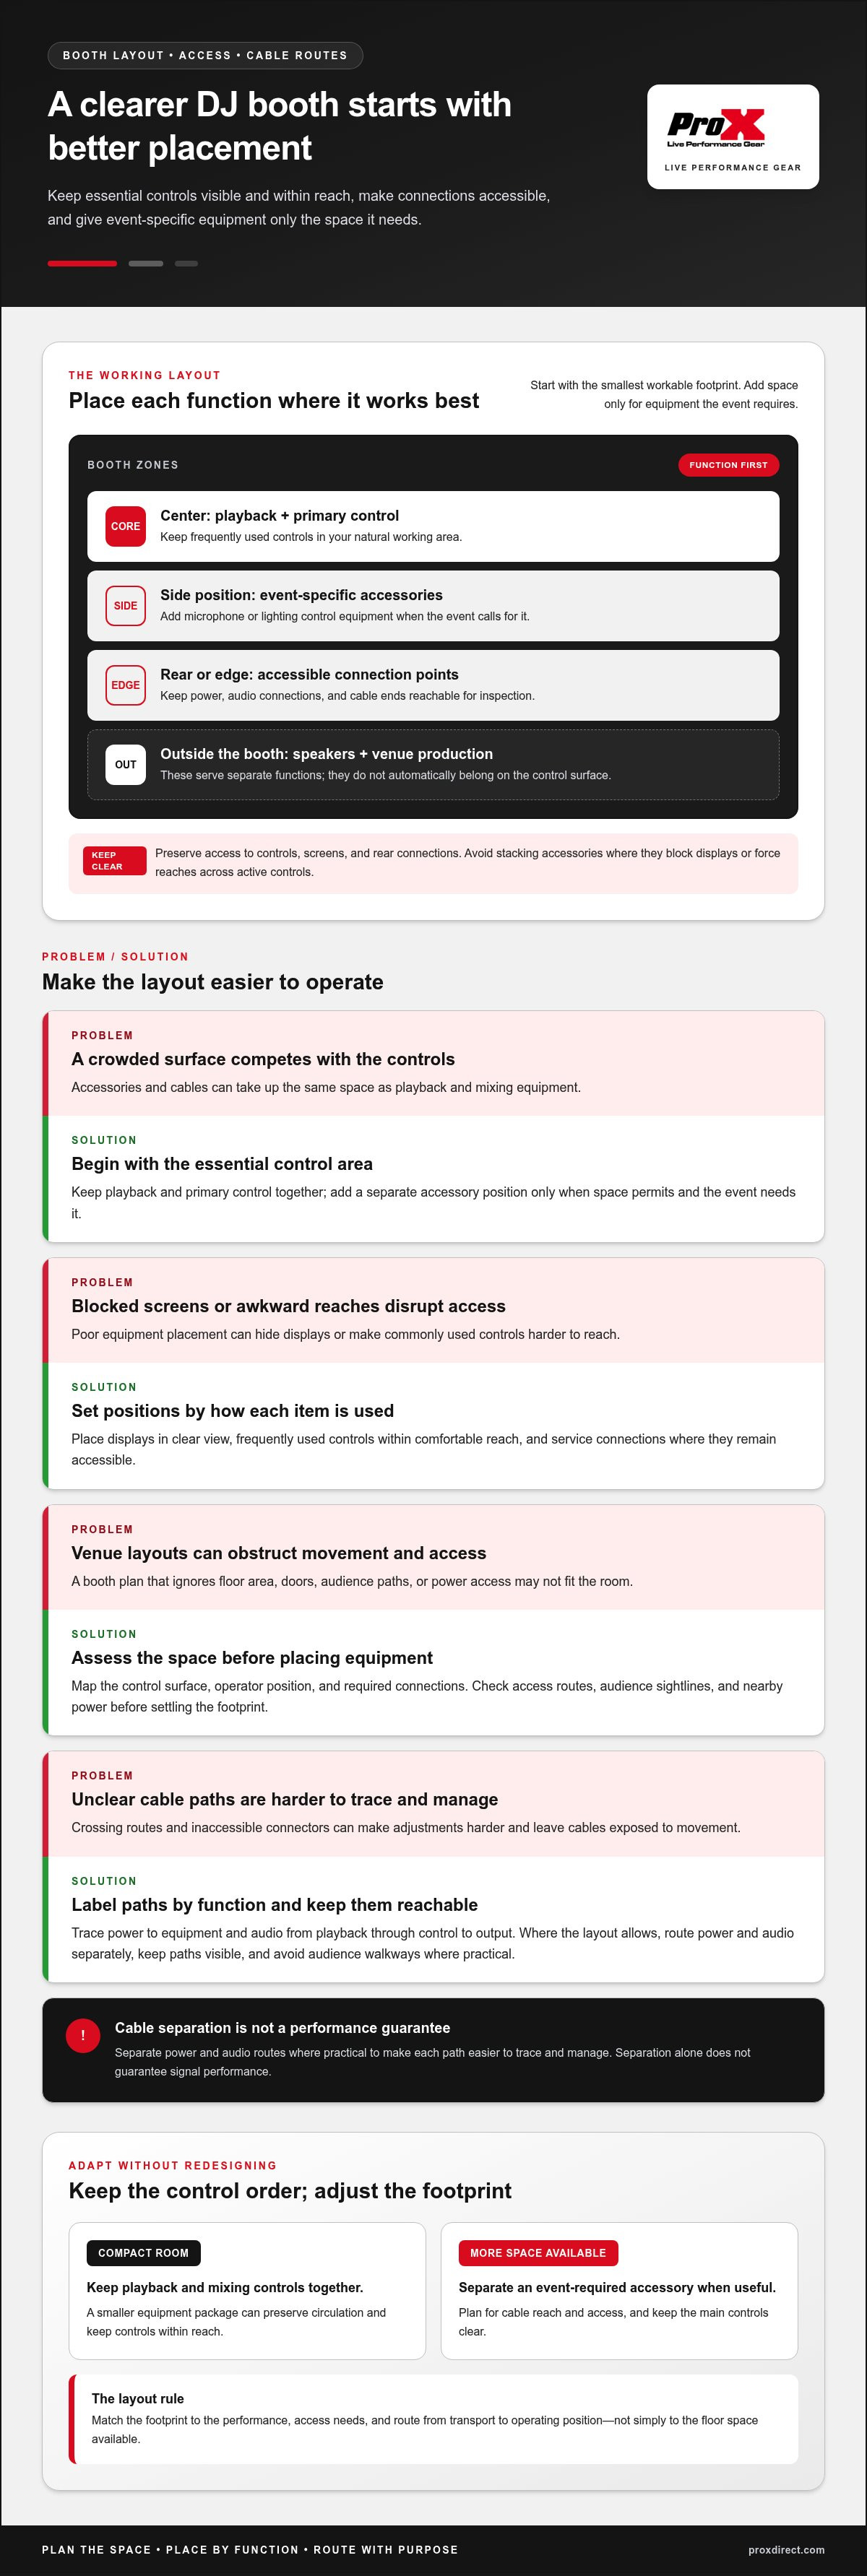
Before adding optional equipment, map the area needed for the control surface, operator position, and required connections. Check that the booth will not obstruct audience paths, doors, or venue access. A modular arrangement lets you add or remove accessory positions while keeping the same control order and connection logic. That way, you can adapt the layout without redesigning the entire setup.
For example, keep playback and mixing controls together in a compact room. If space permits, place an event-required accessory on a separate surface. In either layout, preserve access to the controls and rear connections. The setup should support the work, not simply fill the available area.
How should the equipment be positioned?
Place the controls you use most in your natural working area. Position displays so you can see them from where you operate, and avoid stacking accessories where they block screens or force you to reach across active controls. Keep connection panels and cable ends accessible for inspection or adjustment. A function-based diagram makes the plan easier to repeat:
- Center: Playback and primary control.
- Side position: Event-specific accessories.
- Rear or edge: Accessible power and audio connection points.
- Outside the booth: Speakers and other venue production equipment.
Where should power and audio connections run?
Route cables along visible, orderly paths, keeping them away from audience walkways where practical. Where the layout allows, use separate routes for power and audio. This makes each path easier to trace and manage, but separation alone does not guarantee signal performance. Leave enough room to identify and reach each connection, and keep connectors clear of equipment movement that could pull or strain them.
Label the cable plan by function: power to equipment, audio from playback through control to output, and any event-specific connections. Use the same labels on your layout diagram, then adjust the route to suit the venue without changing the connection logic. For transport between venues, protective cases for DJ equipment can help keep components grouped according to their role in the setup.
Which booth configuration fits your event, equipment, and transport needs?
No single booth arrangement suits every event. A layout that works in a small room may limit access at a larger production, while extra components can add setup steps without improving the performance. Choose a configuration based on the venue, equipment list, operator access, and transport plan. The three options below are starting points, not fixed packages.
| Configuration | Setup footprint | Access | Cable complexity | Transport handling |
|---|---|---|---|---|
| Minimal rig | Small | Core controls are close together; fewer accessory positions | Fewer connections to route | Fewer separate components to move and place |
| Expanded event rig | Larger | More room for event-specific controls and accessories | More connections to identify and manage | Additional gear requires planned handling and placement |
| Separate components | Flexible, based on venue layout | Components can be positioned for clear access | More interconnections between positions | Components are handled and deployed individually |
Use the comparison to assess your actual signal path and venue, not as a ranking. A minimal rig can be efficient when the equipment list is short, but leaves less room for additional controls. An expanded rig supports more event functions, yet every added component takes up space and must be connected and checked. A separated configuration can adapt to an irregular booth area, but calls for deliberate cable routing and a clear placement plan.
Account for transport before you arrive. Consider each component’s size and handling needs, how many pieces must be moved, and where they will sit after unloading. A layout that looks workable on a venue plan may be inefficient if it means carrying components through a restricted access route or assembling them in a congested area.
When does a compact setup make sense?
Choose a compact layout when booth space is restricted and the event requires a short equipment list. Keeping essential controls together can reduce the footprint and simplify placement. The trade-off is less room for optional controls or accessories, so confirm that the layout still supports every required function.
When should equipment remain separated?
Separate components when the equipment mix or venue layout makes a single surface impractical. This adds connections and individual handling, so include those tasks in your setup and testing plan. If case fit affects how you group and transport components, use this professional DJ equipment case guide to consider equipment dimensions and case layout alongside the booth plan.
What setup sequence helps prevent missed connections and last-minute changes?
A repeatable setup sequence turns venue variables into a series of checks. Use the same order for assessment, placement, connections, testing, and pack-down, adjusting for the equipment and room. This mobile DJ booth setup guide follows the signal path so you can trace and verify each connection before the performance begins.
What should you do before connecting the equipment?
Before unpacking, confirm the booth position, available power access, and equipment list. Compare your planned layout with the actual space, then place each component in its operating position with connection points within reach. A labeled checklist identifies the cables and accessories needed for this rig, rather than relying on memory or filling the work surface with spare items.
- Assess the venue. Confirm the booth location, operator access, and practical routes for power and audio connections. This helps prevent repositioning equipment after cables are attached.
- Check the inventory. Use the event equipment list to verify that each required component, cable, and accessory is present. Note event-specific additions before setup begins.
- Place the equipment. Arrange components in the planned operating order, keeping controls visible and service connections accessible. Set the working layout before routing cables.
- Make connections methodically. Follow the documented signal path from playback through control to audio output. Connect power as required by the rig, and keep each route identifiable and orderly.
- Test the complete system. Verify connections in sequence, then check playback, monitoring, output, and access to controls. Testing the full signal path confirms that audio travels through each connected stage to the intended output.
- Record changes and pack down. Note adjustments that improved access or addressed a venue constraint. At breakdown, disconnect each component and return it and its accessories to assigned storage locations.
How should you test the booth before doors open?
Start at the playback source and follow the signal path through each stage, confirming operation as you go. Check monitoring and output at a suitable level, then make sure controls remain reachable and cables stay secure in their routes. If you change a connection or equipment position during testing, retest the affected path and record the adjustment for the next event.
Final sound-check checklist:
- Playback source operates as intended.
- Signal passes through the planned control path to the output.
- Monitoring and output are audible at a suitable level.
- Frequently used controls and connection points remain accessible.
- Cables are orderly, secure, and clear of walkways where practical.
Pack-down is part of the workflow, not an afterthought. Group components and accessories according to how you will deploy them next time, and use protective cases suited to the equipment dimensions and handling needs. Explore protective cases for DJ equipment to support an organized transport and setup process.
How do protective cases support a repeatable mobile DJ booth workflow?
A consistent booth routine depends on more than the order of connections. Equipment also needs an assigned place during transport, storage, and deployment. Matching protective cases to the dimensions and handling needs of your gear helps keep components organized between events. In a mobile DJ booth setup guide, case planning connects packing the rig with rebuilding it in a predictable order at the venue.
What should you consider when packing booth equipment?
Group equipment by its role in the setup. Keep playback and control components together where practical, and assign locations for related cables and accessories. This makes it easier to identify what belongs at the booth and reduces the chance of overlooking loose items during pack-down. Choose case interiors suited to the equipment they carry, with support for its shape and vulnerable controls or connections. Do not assume one interior will fit every component.
Arrange your pack-down inventory in the reverse order of setup. If the first case opened supplies the playback equipment, list it first in the deployment checklist and last in the pack-down sequence. This makes it easier to account for each component and its accessories before leaving the venue. Identify event-specific additions separately so they do not become permanent clutter in the core rig.
How can case planning reduce setup friction?
A consistent packing order makes each deployment easier to repeat: components come out in a known sequence, accessories are easier to locate, and the inventory can be checked against the equipment in the booth. Match case dimensions to the equipment being carried, and arrange the interior to organize it without obstructing access. When a component changes, update the inventory and packing plan at the same time.
ProX designs and manufactures protective cases for DJ and other live-event equipment, and offers custom case engineering tailored to equipment dimensions and protection requirements. Consider case planning as part of the transport and deployment workflow, especially when a rig includes components with different shapes, handling needs, or packing priorities.
Think of each case as an assigned storage position, not just a container. A clear place for every component makes omissions easier to spot and helps keep the booth footprint consistent from event to event. For a broader look at how protective case design relates to professional equipment, see the flight case engineering guide. The same planning principle applies: match case construction and internal organization to the gear’s dimensions and intended handling.
Put Your Booth Workflow to Work
Use this mobile DJ booth setup guide as a baseline, then refine your routine after each event. Record venue-specific changes, note equipment or accessories that went unused, and flag packing adjustments that could simplify the next deployment. Over time, these notes become a practical reference for adapting without rebuilding the workflow from scratch.
The right case plan supports that process beyond the booth itself. ProX has engineered performance gear since 1984 and manufactures protective cases for DJ and live-event equipment. Match each case to the equipment’s dimensions and handling needs, and include assigned storage locations in your operating plan. This makes the transition from transport to performance more deliberate, with fewer decisions left for the venue.
Choose one improvement to carry into your next event, then refine the routine as you learn what works for your equipment and venues. Explore ProX case solutions to organize your equipment workflow and build a setup process you can rely on.
Frequently Asked Questions
Can one mobile DJ booth layout work for every event?
No. A familiar base layout can provide consistency, but equipment and placement may need to change with the venue, performance format, and available space. For example, a reception with announcements may need a microphone within reach, while a smaller private event may not. Keep the main control positions consistent where possible, then document event-specific changes so adaptations do not create a completely unfamiliar working arrangement.
What should a mobile DJ do before arriving at a venue?
Review the event schedule, equipment list, venue access details, and any setup restrictions provided by the organizer. Confirm where equipment can be unloaded and whether the booth position has changed since planning. Prepare the music library and playlists, check that required media and accessories are packed, and note any venue questions that affect the setup. This reduces avoidable decisions on arrival.
How can I keep a DJ booth looking organized during an event?
Keep only active controls and essential accessories on the working surface. Store spare adapters, personal items, and unused cables in assigned locations rather than beside the controls. Label cables consistently and gather excess slack out of view without blocking access or putting tension on connectors. A quick visual check between performance segments can catch displaced items before they interfere with operation.
Do mobile DJs need backup music or playback options?
A backup playback option can reduce dependence on a single device or media source, though the right choice depends on the rig and event. Prepare an alternate source with a separate selection of essential tracks, and confirm that it can connect through the planned audio path. Keep it accessible without crowding the main controls. Test the changeover before the event so you know which connections and settings need adjustment.
How do I manage guest music requests without disrupting a DJ set?
Set a simple request process before the event, such as directing guests to one point of contact or collecting requests in a designated place. Review each request between transitions rather than searching during an active mix. Consider whether the track suits the event, timing, and current music direction, and communicate clearly if it cannot be included. This keeps requests organized without giving guests access to performance controls.
What should I include in a mobile DJ booth pack-down checklist?
Include every component and accessory brought to the event, with a separate note for items added on site. Check personal devices, adapters, removable media, microphones, and power supplies before closing cases. Record any damage, missing item, or setup change while it is easy to identify. A checklist organized by storage location helps distinguish packed equipment from items still connected or left elsewhere in the venue.
Can I use a mobile DJ booth outdoors?
Yes, if the equipment can be positioned and operated in conditions appropriate to its design. Choose a sheltered, stable location and protect equipment from precipitation, direct exposure, dust, and accidental contact. Route cables where guests will not cross or disturb them, and avoid placing equipment on a surface that may shift. Check outdoor conditions during the event and move or cover equipment if exposure increases.
Disclaimer
Any trademarks, trade names or brand names appearing herein that do not belong to ProX are the property of their respective owners and/or companies, and such appearance doesn't and shall not constitute or imply endorsement, sponsorship or recommendation by ProX.


