

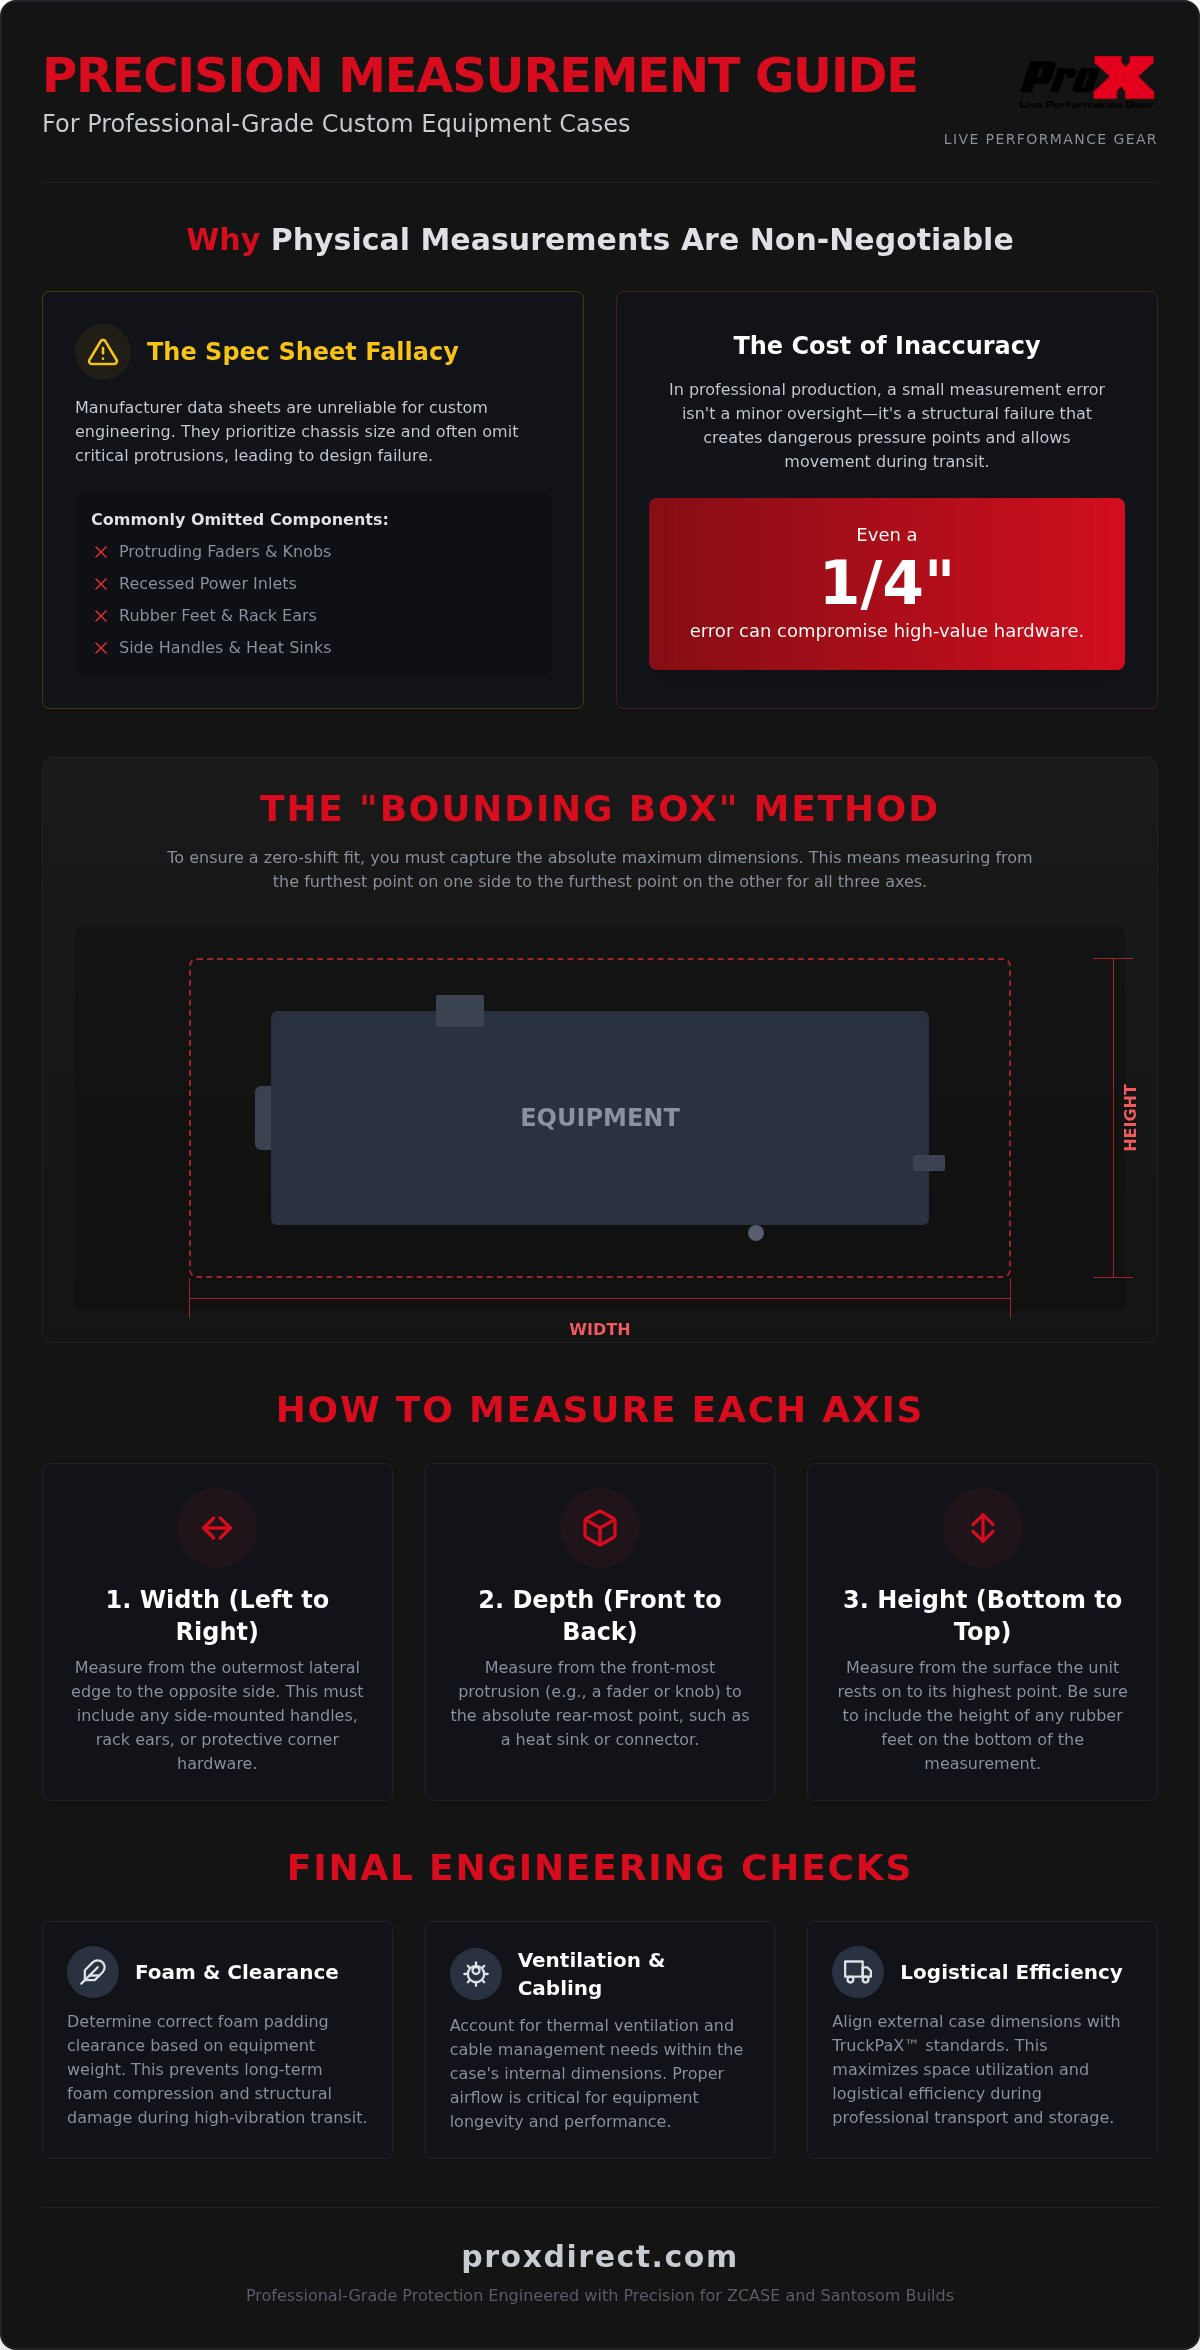
Relying on a manufacturer’s digital spec sheet to design a custom enclosure is the fastest way to compromise high-value production hardware. While a PDF might list general dimensions, it rarely accounts for the physical reality of a protruding fader, a recessed power inlet, or the specific arc of a heavy-duty handle. You understand that in professional production, a 1/4-inch error isn't just a minor oversight; it's a structural failure that creates dangerous pressure points or unnecessary internal movement during transit.
This guide establishes a rigorous engineering framework for how to measure equipment for a custom case to ensure total compatibility with Santosom or ZCASE specifications. You'll learn the precise techniques for dimensioning irregular hardware, accounting for ventilation requirements, and calculating the necessary tolerances for protective foam and cabling. By following this methodical checklist, you can submit your technical data with the confidence that the resulting build will meet the highest standards of durability and logistical efficiency. We'll examine the mechanical assembly requirements for various gear types, ensuring your equipment remains secure within its ATA 300 category housing.
Key Takeaways
- Identify why manufacturer data sheets are insufficient for custom engineering and why physical hand-measurements are required to account for faders, knobs, and feet.
- Learn the "bounding box" methodology for how to measure equipment for a custom case, ensuring irregular hardware geometries are fully captured for CAD modeling.
- Determine the correct clearance ratios for foam padding based on equipment weight to prevent structural damage from long-term foam compression.
- Understand how to account for thermal ventilation and cable management requirements within the internal dimensions of a Santosom or ZCASE custom build.
- Align your internal equipment specifications with TruckPaX™ standards to maximize logistical efficiency and space utilization during professional transport.
Why Precise Equipment Measurement is Critical for Custom Protection
Precise measurement is the primary engineering requirement for professional-grade equipment protection. In high-vibration touring environments, the objective is a zero-shift fit where the gear remains static despite external kinetic energy. Achieving this requires moving beyond basic data entry. Understanding how to measure equipment for a custom case is about identifying the physical limits of a device rather than its marketing dimensions. Even a 5mm discrepancy in depth can compromise the structural integrity of the internal foam assembly, leading to accelerated wear or impact damage during transit.
The Difference Between Internal and External Dimensions
Internal dimensions (ID) represent the actual volume required for the hardware plus its protective padding and airflow requirements. Conversely, external dimensions (ED) dictate the logistical footprint for storage and transport. When engineering ProX Cases, the ratio between ID and ED is determined by the material thickness of the build. Using 3/8-inch or 1/2-inch plywood significantly shifts the external profile while the internal cavity remains constant. This distinction is vital for maintaining compatibility with TruckPaX™ standards, where external uniformity is required for efficient truck packing and logistical optimization.
Why Hand-Measuring Trumps Official Spec Sheets
The "Manual Fallacy" is a common failure point in custom case design. Manufacturer spec sheets often prioritize the chassis dimensions while omitting critical protrusions like rubber feet, rack ears, or rear-mounted heat sinks. Using principles of Geometric Dimensioning and Tolerancing (GD&T), a physical audit identifies these real-world variables. It's the only way to ensure total accuracy for high-stakes builds.
Equipment revisions often occur mid-production cycle. A "Version 2.0" mixer might feature slightly different handle placements or cooling fan vents that aren't reflected in an outdated online PDF. Relying on digital specs alone introduces a risk of interference between the equipment and the case walls. A physical audit ensures the ZCASE or Santosom build accounts for the specific unit in your inventory. Mastering how to measure equipment for a custom case begins with this physical verification, treating the hardware as a 3D object rather than a list of numbers on a screen.
The Step-by-Step Process for Measuring Gear Dimensions
Before recording any data, place the equipment on a flat, stable surface. A level workbench or a concrete floor prevents axis distortion and ensures that all measurements are perpendicular to the mounting plane. Professional results require specific tools: a steel tape measure for primary dimensions, digital calipers for small protrusions like toggle switches, and a carpenter's square to verify the outermost boundaries. Using a square allows you to project the widest point of a chassis onto the measuring surface, eliminating the parallax error often caused by measuring "by eye."
Consistency in data recording is vital for engineering accuracy. Follow the standard industrial format: Width (Left to Right) x Depth (Front to Back) x Height (Bottom to Top). When learning how to measure equipment for a custom case, you must identify the absolute maximum displacement for every axis. If a handle or a protective bumper extends beyond the main chassis, that protrusion defines the boundary. This "widest point" rule ensures the finished enclosure will close securely without physical interference or dangerous pressure points on delicate components.
Measuring Width (The Horizontal Axis)
Measure from the outermost lateral edge to the opposite outermost edge. This measurement must include rack ears, side-mounted handles, or corner reinforcements. For large-format mixing consoles or wide-panel interfaces, these lateral points dictate the placement of internal support blocks. Santosom Cases are engineered using these precise horizontal metrics to provide wide-format protection that remains balanced and structurally sound during high-vibration transit.
Measuring Depth (The Longitudinal Axis)
Depth is measured from the front-most protrusion, such as a fader or encoder knob, to the rear-most point. You must account for rear-mounted connectors, permanent power cables, or heat sinks that extend past the chassis. For rackmount gear, distinguish between the "rackable depth" and the "total depth." The total depth includes front handles and rear cable management brackets, which is the critical figure for ensuring the case lids can be latched without making contact with the hardware controls.
Measuring Height (The Vertical Axis)
Measure from the surface, including any rubber feet or base plates, to the highest vertical point of the unit. Do not assume the chassis top is the peak. Check for antennas, flip-up screens, or top-mounted cooling vents. In AV-Broadcasting Cases, height metrics are particularly critical because they often house integrated monitors that require specific foam compression levels to protect the glass without crushing the panel. Once you've captured these primary dimensions, you can browse the ProX Cases catalog to identify the best structural starting point for your build.
Accounting for Protrusions, Connectors, and Irregular Geometries
When assessing non-standard hardware, the most effective strategy is the imaginary bounding box method. This engineering technique involves visualizing the smallest rectangular volume that can fully contain the equipment, including every lateral and vertical extension. For irregular items like lighting fixtures or ergonomic controllers, these boundary points define the internal dimensions of the enclosure. Understanding how to measure equipment for a custom case requires looking past the primary chassis to identify critical protrusions that dictate the final internal layout. Components such as faders, toggle switches, and recessed handles require specific foam relief or cutouts to prevent mechanical stress during high-vibration transport.
Thermal management is another vital consideration for high-performance electronics. Amplifiers, servers, and high-intensity power supplies generate significant heat that must be dissipated to prevent hardware failure. When dimensioning these units, you must account for air gaps. Leaving a 1 to 2-inch clearance around intake and exhaust vents ensures that the protective foam does not obstruct airflow. This spatial planning prevents heat soak during operation, particularly in integrated workstations where equipment remains powered while seated in the case base.
Measuring for Knobs, Faders, and Joysticks
To capture the vertical displacement of control surfaces, place a straight edge across the highest points of the chassis. Use a caliper to measure the distance from the chassis face to the underside of the straight edge at the tallest knob or joystick. Faders require additional travel clearance. If a fader is at the top of its track, the foam must not exert downward pressure that could snap the stem. For specialized fader protection, ZCASE Custom Build Cases utilize precision CNC-cut foam that creates a protective void over sensitive control paths, ensuring zero contact with the interface components.
Connector Clearance and Cable Management
The cabling gap is a non-negotiable metric for operational efficiency. Measure the depth of your deepest connector while it is plugged into the rear or side panel. A straight XLR plug often requires 3 to 4 inches of clearance, whereas a right-angle connector might only need 1.5 inches. You must also calculate the bend radius for heavy-duty power cables; forcing a thick cable into a tight 90-degree turn causes internal strain and eventual copper fatigue. Many large-format console cases incorporate a "doghouse" feature. This is a dedicated internal compartment that conceals connectors and provides a protected staging area for cable looms, allowing the gear to remain patched during transit without risking damage to the ports.
Calculating Clearance and Foam Compression for Optimal Fit
Precise hardware dimensions are only half of the engineering equation. To finalize the build specifications, you must calculate the volumetric allowance for protective padding. Understanding how to measure equipment for a custom case involves factoring in foam density and its specific response to static loads. If the padding is too thin, the gear will bottom out during a high-impact event. Conversely, padding that is too soft for the equipment’s weight leads to "foam compression," where the hardware sinks over time, creating a loose fit that permits dangerous internal movement.
Material selection is dictated by the equipment's mass and fragility. Ester foam, a soft polyurethane, is open-cell and highly supportive for lightweight interfaces or delicate control surfaces. It absorbs high-frequency vibrations effectively. Plank foam, or polyethylene, is a rigid, closed-cell material used for structural support. It's the standard for heavy items like power distributors or large-format speakers. To find the Total Internal Dimension (TID), apply this formula: Equipment Dimension + (Foam Thickness x 2). This ensures the case shell is sized correctly to house both the gear and its protective layers without crushing the padding.
Choosing the Right Foam Thickness
Standard 1-inch foam is the baseline for electronics weighing under 25 lbs. For heavier gear, such as units containing large toroidal transformers, 2-inch high-density padding is required to maintain structural integrity. Shock-mount rack systems require a different approach. You must measure the external dimensions of the internal rack frame and add a "sway space" allowance. This gap allows the rubber isolators to flex without the rack hitting the outer case wall. Santosom engineering focuses on high-density foam precision, using CNC-milled inserts that account for these compression variables to ensure a permanent, zero-shift fit.
Ventilation and Thermal Management
High-performance production gear requires consistent airflow to prevent thermal shutdown. During the measurement phase, identify every intake and exhaust vent on the chassis. An air-gap of at least 1.5 inches should be maintained around these ports. For equipment that stays powered while in the case base, such as servers or amplifiers, solid foam blocks must be replaced with vented spacers. You should decide between solid protection and vented case panels based on the expected duty cycle of the gear. If you’re unsure about the thermal requirements for your specific hardware, you can consult the ProX Cases technical catalog to find pre-configured vented solutions.
Integrating Measurements into Custom Santosom and ZCASE Engineering
Data entry into our engineering system is the final stage of the measurement process. ProX engineers translate your hand-measured dimensions into detailed CAD models. This digital blueprint guides the CNC machining of the plywood panels and foam inserts, ensuring that every internal support is positioned with engineering accuracy. Mastering how to measure equipment for a custom case ensures that these automated processes produce a perfect physical match. Inaccurate data at this stage leads to mechanical interference, but precise metrics allow for the seamless integration of hardware into its protective environment.
The design phase also accounts for the material science of the build. Engineers select specific plywood grades and hardware based on the weight and dimensions you provide. For example, a heavy-duty mixer requires different weight distribution than a lightweight LED controller. Your data allows the manufacturing team to balance the case's center of gravity. This is essential for stable handling and stacking during professional transport. It's the difference between a generic container and an engineered protection system.
Logistical Optimization with TruckPaX™
Logistical efficiency is as critical as hardware protection. By aligning your measurements with the TruckPaX™ guide, you ensure your custom build fits into a standardized transport ecosystem. External dimensions are calculated in multiples of 22.5 inches or 45 inches. This precision allows for interlocking truck packs that maximize trailer volume and reduce shipping costs. When you provide accurate internal data, our engineers can maintain these external standards while providing the necessary internal clearances for your gear. This modular approach eliminates wasted space and prevents load shifting in high-vibration environments.
Finalizing the Custom Design Request
Before submitting your request to the dealer portal, compile a comprehensive spec sheet. This document must include the unit's exact model number, physical dimensions, total weight, and a list of integrated accessories. High-value assets often require the bespoke engineering found in Santosom Cases, while gear requiring rapid deployment may benefit from ZCASE Flip Ready designs. It's vital to choose the build style that matches your transport frequency and equipment value.
Perform a final audit of your measurements before submission. This double-check is the most effective way to prevent manufacturing errors. You should verify every axis one last time, ensuring that all protrusions and cabling requirements are included in the final figures. Once the data is verified, your custom project can proceed from design to manufacturing without technical setbacks, resulting in a professional-grade enclosure that meets every structural requirement.
Securing Your Technical Assets for Professional Transit
Mastering how to measure equipment for a custom case is the essential first step in a professional protection strategy. By moving beyond manufacturer spec sheets and conducting a physical audit of every protrusion, you eliminate the risk of structural interference. Integrating these precise metrics with calculated foam compression ratios ensures that high-value hardware remains static during the most demanding logistical cycles. This technical precision is what differentiates a standard storage box from an engineered system designed for high-vibration environments.
ProX provides the industrial infrastructure to turn your data into a finished product. Our partnership with ZCASE and Santosom delivers ATA 300-style protection standards and bespoke CNC-machined foam inserts tailored to your specific unit. With global dealer support for custom projects, you have access to the expertise required for complex builds. You can now Request a Custom Engineering Quote for Santosom or ZCASE to begin your manufacturing process. Your equipment deserves the reliability of a precision-engineered enclosure that maintains its integrity over hundreds of round trips.
Frequently Asked Questions
Should I measure my equipment in inches or millimeters?
Use millimeters for the highest level of engineering precision. While inches are standard in North American logistics, the metric system eliminates rounding errors that often occur with fractions. When learning how to measure equipment for a custom case, providing data in millimeters ensures total accuracy for Santosom or ZCASE CAD modeling. If you use inches, provide decimals to the nearest hundredth rather than rounding to the nearest quarter inch.
How much extra space should I leave for foam padding?
You should provide the net physical dimensions of the gear without adding extra space. Our engineering team calculates the necessary clearance based on the weight and fragility of your hardware. Adding your own cushion often results in a loose fit that compromises protection. We determine the appropriate thickness of Ester or Plank foam to meet ATA 300 standards, ensuring the equipment remains static during high-vibration transport.
Do I need to include the power cord in my measurements?
Permanent power cables must be included in the total depth measurement. For detachable cables, you must account for the depth of the connector while it is plugged into the chassis. Measuring only the chassis ignores the cabling gap required for operational use. We recommend measuring the deepest plug in your inventory to ensure the case lid closes without exerting pressure on the rear-mounted ports or cable looms.
How do I measure the depth of a rackmount unit?
Measure from the front face of the rack ears to the rear-most protrusion, such as a heat sink or connector. This is the rackable depth. You must also capture the total depth by measuring from the front handles to the rear of the unit. This data is critical for engineering Amp & Effects Rack Cases, as it dictates the required clearance for both the front and rear case lids.
What happens if my equipment has an irregular or curved shape?
Use the bounding box methodology to capture the maximum volume of the unit. This involves measuring the widest, deepest, and tallest points as if the gear were encased in a perfect rectangle. For curved surfaces, use a carpenter's square to project the outermost edges onto a level surface. This ensures the CNC-machined foam inserts provide full structural support at every contact point, preventing the gear from shifting.
Should I measure the equipment weight with or without accessories?
Provide the total weight of the equipment including all permanent accessories and attached hardware. Weight dictates the density of the foam required for the build. If you plan to store cables or pedals within the same compartment, include their mass in your calculations. Accurate weight data prevents foam compression over time, ensuring the padding continues to absorb kinetic energy effectively throughout the lifespan of the case.
Can I use dimensions from the manufacturer's PDF manual?
Manufacturer spec sheets are often unreliable because they omit protrusions like feet, knobs, and handles. We require a physical hand-measurement audit for every custom project. Manuals may also reflect an earlier revision of the hardware that doesn't match your specific unit. Learning how to measure equipment for a custom case physically is the only way to guarantee a zero-shift fit and avoid costly manufacturing errors.
How do I account for heat dissipation in a custom case?
Identify the location of all intake and exhaust vents on your gear and note them on your spec sheet. We recommend leaving a 1.5-inch air-gap around these areas to prevent thermal shutdown. For high-performance servers or amplifiers, we can integrate vented panels into the design. Providing these specific metrics allows our engineers to position foam supports so they don't obstruct the unit's internal cooling system during operation.
Disclaimer
Any trademarks, trade names or brand names appearing herein that do not belong to ProX are the property of their respective owners and/or companies, and such appearance doesn't and shall not constitute or imply endorsement, sponsorship or recommendation by ProX.


