

A portable stage truss can look assembled and still be unsafe if its components, connections, or load plan don’t match the manufacturer’s specifications. Knowing how to assemble a portable stage truss starts with checking compatibility and documentation, not fitting parts together by eye. If you’re uncertain about stability, load capacity, or setup order, resolve that uncertainty before assembly continues.
This guide outlines a specification-led process for planning, assembling, and inspecting a portable setup. It explains what to confirm in the manufacturer’s instructions and load documentation, how to check components and connection hardware, and how to follow a controlled assembly sequence. It also covers when damage, mismatched parts, unclear instructions, or an unverified load path are reasons to stop and seek qualified technical support. The goal is a setup based on documented limits and verified connections, not assumptions.
Key Takeaways
- Check the manufacturer’s manual, parts list, and site conditions before positioning components.
- Confirm that truss sections, connectors, pins, and base plates belong to the specified system and match its documented connection method.
- Follow the system manual’s configuration, support, and connection instructions rather than relying on a generic setup pattern.
- Use the applicable load documentation to assess whether a proposed configuration suits the production requirements.
- Record the completed inspection and configuration. If compatibility, damage, or load limits are unclear, stop and seek qualified technical support.
Before assembling a portable stage truss, verify the system and the site
Start with the exact manufacturer’s manual for the truss system. Before moving sections into position, confirm the intended configuration, approved components, connection method, and support requirements. If the manual or parts list is missing, or the proposed layout isn’t clearly covered, pause and obtain the correct documentation instead of relying on memory or a similar-looking setup.
Use the parts list to inventory each truss section, connector, base plate, pin, and other specified hardware. Check that the proposed build and intended use are addressed in the system documentation. Truss members carry loads through structural elements working in tension and compression. This overview of truss principles provides useful background, but it doesn’t replace system-specific assembly or load instructions. If you’re comparing systems, review the available portable truss systems and their manufacturer documentation.
How to confirm portable truss component compatibility
Match section dimensions, connection type, and hardware to the exact system documentation. Components that look alike may have different connection details or require different hardware, so don’t assume that parts from separate systems are interchangeable. Record any missing, damaged, altered, or unidentified components. Set them aside and keep them out of the build until their suitability is confirmed against the manufacturer’s information.
What to assess at the assembly site
Check that the ground condition, available footprint, overhead clearance, and crew access routes suit the documented configuration. Define a work area that keeps bystanders clear, and agree on how crew members will communicate before work begins. Assign responsibilities, including who can pause the work if site conditions change, a component raises concern, or instructions are unclear.
Stop if the location doesn’t meet the system’s stated requirements, equipment condition is uncertain, or the crew lacks the competence needed for its assigned tasks. Reassess if ground stability, clearance, access, or public separation changes during setup. Knowing how to assemble a portable stage truss starts with checking these conditions and resolving uncertainties before assembly, not improvising once components are in position.
Understand truss sections, connectors, base plates, and load documentation
Each truss section belongs to a specific engineered system. Its geometry, end details, and connection method are manufacturer-specific, so matching a section by appearance or approximate dimensions isn’t enough. Identify connectors and pins for that system, then install them as its documentation directs. A connection that seems to fit doesn’t prove that it’s compatible or suitable for the planned configuration.
Base plates provide a designed interface between a truss structure and its support surface, but their presence alone doesn’t prove that the assembly is stable or appropriate for the site. Assess the full configuration, support conditions, connections, and intended loads using the manufacturer’s documentation. For background on the standard covering aluminum trusses and towers, consult the ANSI E1.2-2021 safety standard. It provides context, not a substitute for the system manual or applicable load chart.
A verified load path is the documented route by which each applied load transfers through the truss, its connections, and supports to the supporting surface. If any part of that route, or the configuration it depends on, is unclear, don’t treat the build as approved.
What information should a truss load chart provide?
Use the manufacturer’s applicable chart for the exact truss system, span, and configuration under consideration. Confirm that the chart’s conditions match the proposed supports, load placement, and accessories, since these details affect which documented limits apply. A chart for another span or setup, or a general rule of thumb, can’t establish approval for your build. If you can’t verify a close match, pause and seek qualified technical guidance.
Why connectors and base plates must match the system
Identify each component using its manufacturer label, system documentation, and part references. Check connectors and pins against the specified connection method, and confirm that the base plate is designated for the system and intended use. Don’t modify, substitute, or combine unidentified parts based on a visual match. After use, suitable cases can help protect and organize components between setups. See this stage truss and base plate case guide for storage context.
To compare options, the stage truss category is a useful starting point for reviewing system choices. For any system, how to assemble a portable stage truss depends on matching its sections, hardware, supports, and load documentation to the manufacturer’s instructions.
Choose an assembly approach that fits the truss design and production
Choose only configurations and assembly methods that the manufacturer’s documentation explicitly permits. A familiar truss shape or a method used on another production doesn’t prove it suits this system, span, supports, or intended loads. Before selecting an approach, confirm the system, intended use, span, support arrangement, accessories, applicable load documentation, site conditions, and crew capability. If any detail falls outside the documented configuration, obtain qualified review before work begins.
Ground assembly and staged assembly aren’t interchangeable shortcuts. The appropriate method depends on the truss design, site, and manufacturer-approved procedure. Use the comparison below as a planning aid, not as approval to use a particular method or arrangement. Check the exact system manual before deciding.
| Approach to assess | Documentation to confirm | Handling demands | Expertise to involve |
|---|---|---|---|
| Ground assembly, if approved | Permitted configuration, connection sequence, supports, span, and applicable load information | Space to lay out and connect sections as directed, with crew access and control of the work area | Personnel competent to follow the system instructions and inspect the connections |
| Staged or section-by-section assembly, if approved | Manufacturer’s method, required connection and support details, and configuration-specific documentation | Controlled handling and clear coordination as sections are assembled in the documented sequence | Personnel with experience appropriate to the documented method; seek qualified review if steps or responsibilities are unclear |
| Suspended or overhead arrangement | Applicable system and load documentation, support details, and qualified planning for the proposed arrangement | Overhead work and suspended loads require controls beyond a generic ground-assembly guide | Qualified rigging professionals; this guide isn’t a procedure for suspended-load or overhead work |
How to compare portable truss configurations
For each permitted option, compare the intended use, span, support arrangement, accessories, and applicable manufacturer documentation. Confirm that the chart or instructions cover the planned arrangement and that the site and crew can meet its requirements. Don’t rank configurations as safer or stronger without system-specific evidence. If the documentation doesn’t clearly address the proposed setup, don’t proceed on assumption.
When to involve a qualified rigging professional
Refer suspended loads, overhead work, unfamiliar connections, complex spans, or uncertain support conditions to qualified rigging professionals. Request qualified review whenever the manufacturer’s documentation doesn’t clearly cover the planned arrangement. A competent person’s assessment and the manufacturer’s instructions remain essential; this overview replaces neither. Understanding how to assemble a portable stage truss also means recognizing when the available information or expertise isn’t enough to proceed.
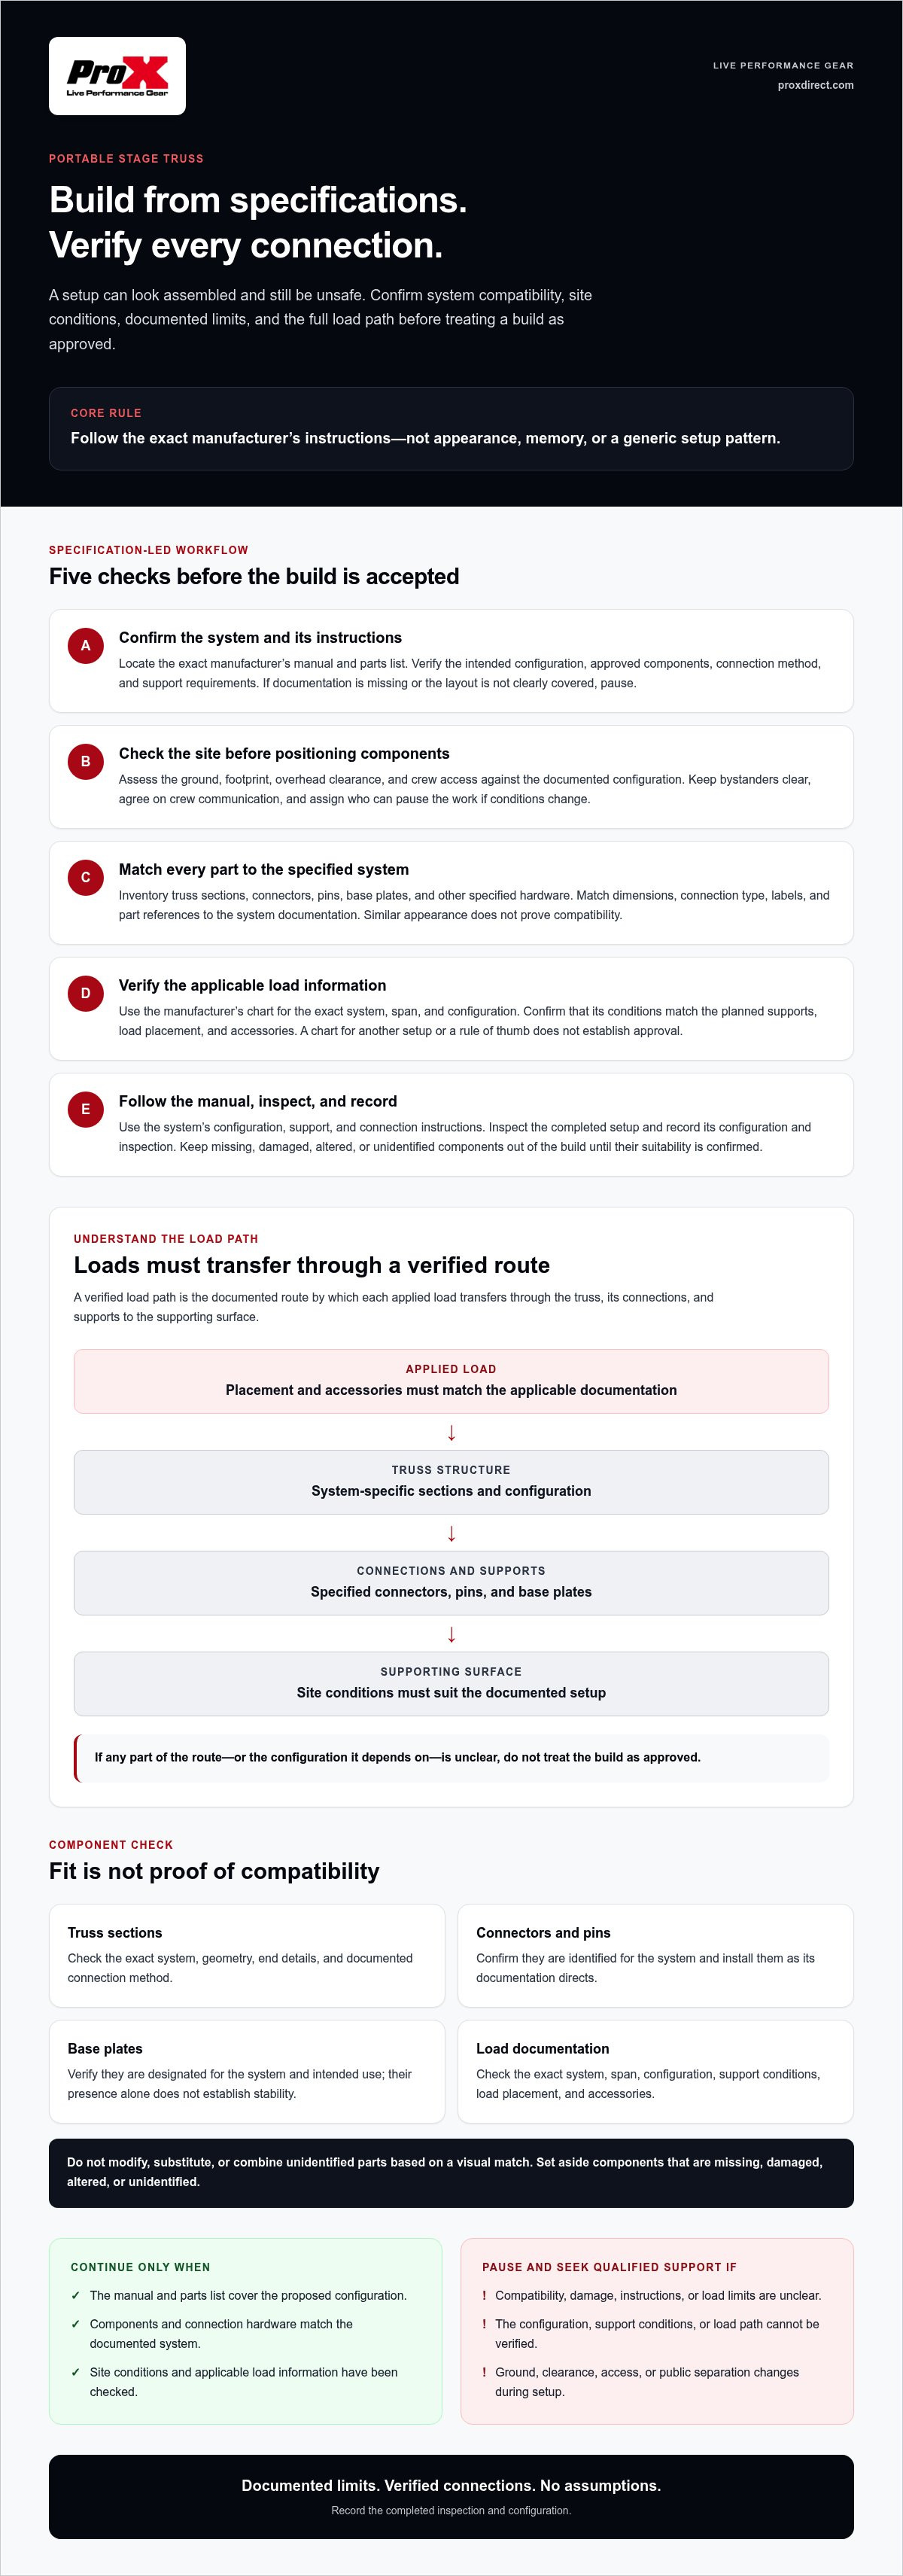
How to assemble a portable stage truss in a controlled sequence
Use this sequence as a planning framework, not as a substitute for the exact manufacturer’s manual. The system instructions control assembly order, connection method, support arrangement, and required checks. Don’t infer bolt torque, pin orientation, lifting technique, or crew size from general guidance. If a detail isn’t specified or understood, pause and get direction from the manufacturer or qualified technical support.
A documentation-led assembly checklist
Before starting, make the approved layout, matching component inventory, required tools, and current manufacturer instructions available to the crew. Keep the manual accessible throughout the work. Confirm who is directing the sequence and who can stop work if a discrepancy or changing condition appears.
- Confirm the plan. Check that the intended configuration and support method are covered by the system documentation and applicable load information.
- Prepare the work area. Confirm that the site remains suitable and the assembly zone is clear of bystanders and obstructions.
- Check components and tools. Compare the parts on hand with the approved inventory. Set aside damaged, unidentified, altered, or mismatched items.
- Position sections as instructed. Follow the documented order and method for the approved assembly approach. Don’t substitute a familiar sequence from another system.
- Make specified connections. Use only the designated connectors, pins, and hardware, installed as directed by the manufacturer.
- Verify before progressing. Check each connection and support against the manual before moving to the next documented stage.
How to check the build before use
Keep people clear of the work area while comparing the completed assembly with the approved layout and intended load plan. Inspect visible connections, supports, base plates, and components using the manufacturer’s checklist. Confirm that the actual configuration matches the documentation, including specified hardware and support arrangement. Record the inspection and resolve discrepancies before putting the structure into use.
Stop work: If a part is damaged, hardware is missing, the structure moves unexpectedly, or instructions are unclear, stop assembly. Keep people clear, don’t improvise a repair or substitution, and seek qualified technical direction before proceeding.
A controlled sequence makes how to assemble a portable stage truss a documentation-led task rather than a matter of guesswork. To compare system options and review available truss products, explore stage truss options.
Inspect, document, and protect the portable truss after assembly
Assembly closeout should give the production team a clear record of what was built, what was checked, and who reviewed it. Use the system owner’s approved checklist, and follow the manufacturer’s instructions for any later changes or disassembly. A completed form supports a consistent handover, but it doesn’t replace technical approval or resolve an undocumented configuration.
What to record after the truss is assembled
Document the approved configuration, inspection outcome, unresolved defects, and responsible reviewer. Keep the record with the applicable load documentation so production personnel can check the intended arrangement against the structure in use. If the setup changes, update the configuration record and obtain appropriate review before using the revised arrangement.
Make unresolved issues visible at handover. Note which components or conditions need follow-up, and don’t present the assembly as cleared for use if required checks or approvals remain outstanding. A clear record helps maintain continuity when responsibility passes between crew members or production teams.
How to store and transport truss components between uses
After use, disassemble and handle the system only according to the manufacturer’s instructions and the crew’s procedures. Keep components grouped by system so sections and hardware aren’t accidentally mixed. Protect connectors and base plates from avoidable impact and contamination, and return components to suitable cases or storage locations that support organized handling.
For case options, review stage truss and base plate cases. A consistent storage arrangement makes it easier to identify components and check inventory before the next setup. Keep system documentation and configuration records accessible instead of relying on memory between events.
Knowing how to assemble a portable stage truss includes planning for inspection, handover, and component care after assembly. These steps preserve a useful record for the next crew and help keep system parts organized between uses.
To compare available options, explore ProX truss systems and confirm product details with the appropriate dealer.
Build confidence through documented decisions
A dependable portable truss setup starts before assembly: verify the system, components, site, and applicable load documentation. During the build, follow the manufacturer’s specified sequence and connection method. Afterward, inspect the completed configuration, record the handover, and keep relevant documentation accessible to the production team.
That’s the practical foundation of how to assemble a portable stage truss without relying on visual guesses or generic setup assumptions. If compatibility, support conditions, or load information are unclear, pause and seek qualified technical review. A clear stop point is part of a responsible assembly plan.
ProX has engineered performance gear since 1984 and serves customers worldwide through a dealer network. To review truss options for your production, explore ProX truss systems and check the applicable product specifications with the appropriate dealer.
Frequently Asked Questions
How do you assemble a portable stage truss safely?
Follow the exact manufacturer’s manual for the system and approved configuration. Before starting, confirm component compatibility, site conditions, support arrangement, and applicable load documentation. Use the specified connections and assembly sequence, checking each stage against the instructions before progressing. Keep people clear of the work area, and stop if parts are damaged, hardware is missing, the structure moves unexpectedly, or any instruction is unclear.
Can different truss brands or connector types be used together?
Combine truss sections and connectors only when the manufacturer’s documentation explicitly confirms compatibility for the intended configuration. Similar appearance or a connection that seems to fit isn’t proof that components work together. Check system labels, part references, and instructions for each component. If you can’t verify compatibility, keep the parts separate and contact the relevant manufacturer or qualified technical support before including them in a build.
What should you check before assembling a portable truss system?
Before assembly, locate the exact system manual, approved configuration, parts list, and applicable load documentation. Inventory the truss sections, connectors, base plates, pins, and specified hardware, setting aside damaged, altered, missing, or unidentified parts. Assess the ground, available footprint, overhead clearance, and crew access. Establish a controlled work area, clear communication, and responsibility for pausing work if conditions or equipment raise concerns.
Do you need a qualified rigger to assemble stage truss?
Not every ground-supported assembly necessarily involves the same rigging tasks, so determine the required expertise from the system instructions, work conditions, and applicable workplace requirements. Suspended loads, overhead work, complex spans, or uncertain supports call for qualified rigging planning and review. Don’t treat a general assembly guide as authorization for those tasks. If the documented method or crew qualifications are unclear, pause and seek appropriate technical support.
How do you know whether a stage truss configuration can support its intended load?
Check the manufacturer’s applicable load documentation for the exact system, span, configuration, supports, and intended load arrangement. Confirm that accessories and load placement are covered too. A chart for a different span or setup, or a general rule of thumb, can’t verify a specific build. If the proposed arrangement isn’t clearly covered, don’t proceed based on an estimated capacity. Obtain qualified technical review.
Can stage truss be assembled on the ground before it is raised?
Ground assembly is appropriate only when the manufacturer’s instructions permit it for that system and configuration. The approved approach depends on the design, site, support method, and production plan. Ground assembly alone doesn’t confirm that raising or supporting the structure is suitable. Follow documented procedures for any subsequent movement or lifting, and involve qualified professionals whenever the plan includes suspended loads or overhead work.
What should you inspect after assembling portable stage truss?
Inspect visible components, connections, supports, and base plates against the manufacturer’s checklist. Verify that the completed arrangement matches the approved configuration and applicable load documentation. Record the inspection outcome, configuration, unresolved defects, and responsible reviewer for handover to production personnel. Keep relevant records accessible. If you find damage, unexpected movement, or an unresolved discrepancy, keep people clear and don’t put the structure into use.
Disclaimer
Any trademarks, trade names or brand names appearing herein that do not belong to ProX are the property of their respective owners and/or companies, and such appearance doesn't and shall not constitute or imply endorsement, sponsorship or recommendation by ProX.


